Laying gypsum plaster
Laying gypsum plaster for smooth, durable interiors
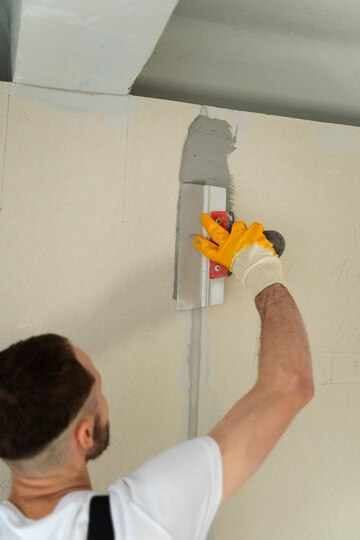
Gypsum plaster is one of the most reliable ways to achieve clean, even walls and ceilings in modern interiors. When applied correctly it creates a dense, smooth surface that is ready for paint, wallpaper, or decorative finishes. Our team lays gypsum plaster with careful preparation and consistent workmanship, so your rooms look sharp and feel solid for years.
We work on new builds, refurbishments, and single room upgrades, matching the method to the substrate and the final finish you want. From small patch repairs to full apartment plastering, we focus on straight lines, flat planes, and tidy edges around openings, sockets, and trim.
Where gypsum plaster works best
Gypsum plaster is ideal for interior spaces where you want a refined finish with efficient drying times and reliable performance. It bonds well to many common building surfaces when the right primer and preparation are used. For projects that also include framing or board systems, we can coordinate plastering with wall and ceiling construction to keep everything aligned and ready for finishing.
Typical applications
- New plaster over masonry such as block or brick walls after proper cleaning and priming
- Skimming and smoothing over existing plaster to refresh tired, uneven surfaces
- Finishing around new openings including door reveals and window returns for crisp edges
- Ceilings where a smooth continuous surface is required before painting
- Repairs for cracks, blown areas, and damaged corners
We will advise if gypsum plaster is the right choice for high moisture areas and suggest alternatives or additional protection where needed. The goal is always a finish that looks great and holds up to real everyday use.
Our gypsum plastering process
Great plasterwork is built on preparation and control. We follow a structured process that reduces defects like cracking, hollows, and visible trowel marks. Each step is planned around the room conditions, the base material, and the target finish level.
- Site inspection and surface assessment to check adhesion risks, moisture, and previous coatings
- Protection and setup including masking, floor protection, and safe access for ceilings
- Surface preparation such as cleaning, removing loose material, and applying bonding agents or primers
- Beading and detailing with corner beads and stop beads to keep edges straight and resistant to knocks
- Mixing and application using the correct ratios and working times for consistent set and strength
- Levelling and ruling to bring walls and ceilings into plane, especially on larger spans
- Trowelling and finishing to produce a smooth, paint ready surface with minimal sanding
- Drying guidance with practical advice on ventilation and heating to avoid shrinkage and staining
If your project includes new partitions or board lined ceilings, we can sequence the job so plastering follows drywall ceiling installation and joint preparation without delays. This helps deliver a consistent finish across all surfaces.
Quality standards you can see and feel
Gypsum plaster should not just look smooth under bright light, it should also feel solid and uniform when you knock on the surface. We pay close attention to thickness, bonding, and timing, because rushed work often shows up later as cracks, weak edges, or uneven sheen after painting.
What we focus on
- Flatness and straightness so cabinetry, skirting, and trim fit cleanly
- Neat junctions at ceilings, corners, and around frames for a professional appearance
- Clean work areas with careful mixing and controlled water use to limit mess
- Compatibility between primers, plaster, and your chosen paint system
- Long term durability through correct preparation and curing guidance
For larger renovations that combine plastering with structural lining, niches, or ceiling drops, we can collaborate with interior wall construction works so transitions are crisp and the final finish remains consistent from room to room.
Pricing, timelines, and what affects the cost
The cost of laying gypsum plaster depends on the size of the area, the condition of the substrate, the number of corners and openings, and the finish level required. Ceilings, high walls, and heavily damaged surfaces usually require more preparation and careful access. After a quick assessment we provide a clear quote that explains what is included, the expected drying time, and how soon you can paint or wallpaper.
We schedule work to reduce disruption, especially in occupied homes. If you need fast turnaround, we can plan a phased approach by rooms and advise on ventilation so surfaces dry evenly.
Book gypsum plastering
If you want walls and ceilings that look clean, feel solid, and are ready for decoration, we are ready to help. Contact us with your room sizes, photos, and your desired finish, and we will recommend the best plastering approach and arrange a convenient time to start.
FAQ
How long does gypsum plaster need to dry before painting?
Drying time depends on thickness, ventilation, and room temperature, but most surfaces need several days to fully dry. The plaster should turn evenly light in color with no dark patches before painting. We will advise the safest timeline for your specific rooms.
Can you plaster over existing painted walls?
Yes, but only after proper preparation. Glossy or unstable paint must be cleaned, keyed, and primed, and loose areas should be removed. We assess adhesion first so the new plaster bonds securely and does not delaminate.
Will gypsum plaster fix uneven walls and corners?
It can improve flatness significantly when applied with proper levelling and beading. For severely out of plumb walls, we may recommend additional build up or corrective preparation before the finish coat. We will explain the best option after inspecting the surfaces.